Deploy http4s on your domain with fly.io
- 1171 words
- 6 min
DISCLAIMER: This article assumes some familiarity with the Typelevel's tech stack, http4s in particular.
There's plenty of good resources to read online to get started with, some of them being Scala with Cats, Essential Effects and the Cats Effect documentation. The best and most comprehensive resource you'll find to develop a microservice using this stack is Practical FP in Scala, that I strongly suggest reading.
If you need help with any of these resources feel free to contact me or better ask questions in the Typelevel's Discord. You'll find an amazing and kind community of really talented people that will be glad to answer to your questions 😄
If you already own a domain, deploying a toy server or any personal server-shaped project on it should not be a complex operation. Using fly.io, scala-cli, http4s and just can help automatise the process and reduce the friction up to the point it might even be fun.
Requirements
Before starting, we'll need to set up a couple of things. Here's the list:
- Having/buying a custom domain and having access to its DNS settings page: I'm using Google Domains since the domains are cheap (most of them cost 12$ per year), but sadly it lacks support for ALIAS records.
- Sign up on fly.io, install its command line tool
flyctland log in usingflyctl auth login - Of course, a local installation of scala-cli (Here's me talking about it on the Rock The JVM blog)
- Optionally the command line tool
justthat Irecentlyreviewed in another article
Writing the application
Writing a hello-world-spitting server with http4s using its giter8 template and sbt it's a trivial task.
Instead, we'll write it manually, using scala-cli and adding a slightly less trivial business logic. To begin, we'll create a file containing a few scala-cli directives to declare the dependencies and the scala version:
//> using scala "3.2.1"
//> using lib "org.http4s::http4s-ember-server::0.23.17"
//> using lib "org.http4s::http4s-dsl::0.23.17"
//> using lib "com.monovore::decline-effect::2.4.1"
//> using lib "ch.qos.logback:logback-classic:1.4.5"
The server will read two environment variables, a mandatory one for the base URL and one for the title of the HTML pages to return. We'll use decline to define them and use them:
import cats.effect.{ExitCode, IO}
import cats.syntax.all.*
import com.monovore.decline.Opts
import com.monovore.decline.effect.CommandIOApp
import org.http4s.Uri

object Server extends CommandIOApp("helloServer", "Greets you in HTML") {

  val titleOpt: Opts[String] =
    Opts.env[String]("TITLE", "Page title").withDefault("Hello")

  val baseUrlOpt: Opts[Uri] = Opts
    .env[String]("BASE_URL", "The base url")
    .mapValidated(
      Uri
        .fromString(_)
        .leftMap(_.message)
        .ensure("base url must be absolute")(_.path.addEndsWithSlash.absolute)
        .map(uri => uri.withPath(uri.path.dropEndsWithSlash))
        .toValidatedNel
    )

  def main: Opts[IO[ExitCode]] = (baseUrlOpt, titleOpt).mapN((baseUrl, title) =>
    IO.println(s"$baseUrl $title").as(ExitCode.Success)
  )
}
The application prints the environment variables' content, validates the base URL's content and adds a default for TITLE.
To add some business logic to the soon-to-be server, we'll add a pure function that builds a tiny HTML page, and we'll use it in our routes implementation:
import cats.effect.kernel.Async
import org.http4s.{HttpRoutes, MediaType, Response, Status}
import org.http4s.dsl.io.*
import org.http4s.headers.`Content-Type`

def page(uri: Uri, title: String): String =
  s"""|<html>
      |<head><title>$title</title></head>
      |<body>Hello from ${uri.toString}</body>
      |</html>""".stripMargin

def routes[F[_]: Async](baseUrl: Uri, title: String): HttpRoutes[F] =
  HttpRoutes.of[F] {
    case GET -> Root / "health" => Response[F](Status.Ok).pure[F]
    case GET -> path =>
        Response[F](Status.Ok)
          .withEntity(page(baseUrl.withPath(baseUrl.path.merge(path)), title))
          .withContentType(`Content-Type`(MediaType.text.html))
          .pure[F]
  }
The simple logic consists in printing the absolute URL of the page that was requested to the server, plus a health check endpoint.
We'll add some logging to our routes leveraging log4cats and slf4j:
 import org.typelevel.log4cats.Logger
 import org.typelevel.log4cats.slf4j.*

+def routes[F[_]: Async: Logger](baseUrl: Uri, title: String): HttpRoutes[F] =
-def routes[F[_]: Async](baseUrl: Uri, title: String): HttpRoutes[F] =
   HttpRoutes.of[F] {
     case GET -> Root / "health" => Response[F](Status.Ok).pure[F]
     case GET -> path =>
+      Logger[F].info(s"Serving $path") >>
         Response[F](Status.Ok)
           .withEntity(page(baseUrl.withPath(baseUrl.path.merge(path)), title))
           .withContentType(`Content-Type`(MediaType.text.html))
           .pure[F]
   }
Our logging backend will be logback, which we'll configure by adding a logback.xml file in our current directory:
<?xml version="1.0" encoding="UTF-8"?>
<configuration debug="false">
    <appender name="STDOUT" class="ch.qos.logback.core.ConsoleAppender">
        <encoder>
            <pattern>
                %d{ISO8601} [%-4level] %logger{0}: %msg%n
            </pattern>
        </encoder>
    </appender>

    <logger name="org.http4s.ember.server" level="ERROR" />

    <root level="INFO">
        <appender-ref ref="STDOUT" />
    </root>
</configuration>
What is lacking now is the logger and server instantiation in our main method. Adding it will finally complete our implementation:
//> using scala "3.2.1"
//> using resourceDir "."
//> using packaging.packageType "assembly"
//> using lib "org.http4s::http4s-ember-server::0.23.17"
//> using lib "org.http4s::http4s-dsl::0.23.17"
//> using lib "com.monovore::decline-effect::2.4.1"
//> using lib "ch.qos.logback:logback-classic:1.4.5"

import cats.effect.{ExitCode, IO}
import cats.effect.kernel.Async
import cats.syntax.all.*
import com.comcast.ip4s.{ipv4, port}
import com.monovore.decline.Opts
import com.monovore.decline.effect.CommandIOApp
import org.http4s.{HttpRoutes, MediaType, Response, Status, Uri}
import org.http4s.dsl.io.*
import org.http4s.ember.server.EmberServerBuilder
import org.http4s.headers.`Content-Type`
import org.http4s.server.middleware.CORS
import org.typelevel.log4cats.Logger
import org.typelevel.log4cats.slf4j.*

object Server extends CommandIOApp("helloServer", "Titles you in HTML") {

  val titleOpt: Opts[String] =
    Opts.env[String]("TITLE", "Page title").withDefault("Hello")

  val baseUrlOpt: Opts[Uri] = Opts
    .env[String]("BASE_URL", "The base url")
    .mapValidated(
      Uri
        .fromString(_)
        .leftMap(_.message)
        .ensure("base url must be absolute")(_.path.addEndsWithSlash.absolute)
        .map(uri => uri.withPath(uri.path.dropEndsWithSlash))
        .toValidatedNel
    )

  def page(uri: Uri, title: String): String =
    s"""|<html>
        |<head><title>$title</title></head>
        |<body>Hello from ${uri.toString}</body>
        |</html>""".stripMargin

  def routes[F[_]: Async: Logger](baseUrl: Uri, title: String): HttpRoutes[F] =
    HttpRoutes.of[F] {
      case GET -> Root / "health" => Response[F](Status.Ok).pure[F]
      case GET -> path =>
        Logger[F].info(s"Serving $path") >>
          Response[F](Status.Ok)
            .withEntity(page(baseUrl.withPath(baseUrl.path.merge(path)), title))
            .withContentType(`Content-Type`(MediaType.text.html))
            .pure[F]
    }

  def main: Opts[IO[ExitCode]] = (baseUrlOpt, titleOpt).mapN((baseUrl, title) =>
    for {
      given Logger[IO] <- Slf4jFactory.create[IO]
      exitCode <- EmberServerBuilder
        .default[IO]
        .withHttp2
        .withHost(ipv4"0.0.0.0")
        .withPort(port"8080")
        .withHttpApp(
          CORS.policy.withAllowOriginAll(routes[IO](baseUrl, title)).orNotFound
        )
        .build
        .useForever
        .as(ExitCode.Success)
    } yield exitCode
  )
}
We added using resourceDir "." to make the file logback.xml discoverable by logback and using packaging.packageType "assembly" to pack our server with all its dependencies to avoid downloading them at every boot.
We can now perform a test running the server locally and visiting localhost:8080/foo:
$ BASE_URL="https://toniogela.dev" scala-cli run .
2023-01-07 23:46:39,183 [INFO] Server: Serving /foo/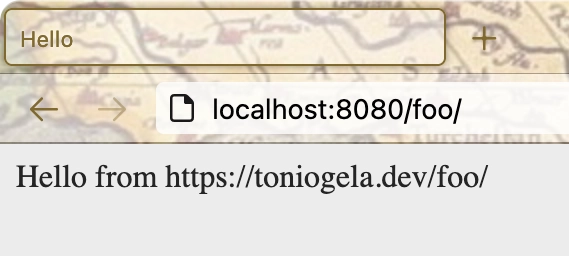
Packing the server as a docker application
Last but not least, since fly.io accepts already-built Docker images to run, we should pack our application in a container. Luckily for us, scala-cli can directly package our server as a docker image using a custom base image:
$ scala-cli package server.scala --docker --docker-image-repository hello-server --docker-image-tag 0.1.0 --docker-from eclipse-temurin:11.0.17_8-jre-alpine
Compiling project (Scala 3.2.1, JVM)
Compiled project (Scala 3.2.1, JVM)
Started building docker image with your application, it might take some time
Built docker image, run it with
  docker run hello-server:0.1.0
$ docker run -e BASE_URL="https://toniogela.dev" -p8080:8080 hello-server:0.1.0
2023-01-07 23:06:30,524 [INFO] Server: Serving /foo/ciao
2023-01-07 23:06:30,866 [INFO] Server: Serving /favicon.ico
Since we'll need to rebuild the app again and the command is quite long, we'll write down a Justfile for ease:
docker_image_name := "hello-server"
docker_image_tag  := "0.1.0"
base_image        := "eclipse-temurin:11.0.17_8-jre-alpine"

_default:
  @just --list --unsorted

# Runs the app on localhost:8080
run:
  BASE_URL="https://hello.toniogela.dev" scala-cli run .

# Build the docker image
build:
  scala-cli package server.scala --docker \
    --docker-image-repository {{docker_image_name}} \
    --docker-image-tag {{docker_image_tag}} \
    --docker-from {{base_image}}
Now rebuilding the app is as simple as running just build
$ just
Available recipes:
    run                 # Runs the app on localhost:8080
    build               # Build the docker image
$ just build
scala-cli package server.scala --docker --docker-image-repository hello-server --docker-image-tag 0.1.0 --docker-from eclipse-temurin:11.0.17_8-jre-alpine
Compiling project (Scala 3.2.1, JVM)
Compiled project (Scala 3.2.1, JVM)
Started building docker image with your application, it might take some time
Built docker image, run it with
  docker run hello-server:0.1.0
Deploying the server or fly.io
Creating our app is as simple as launching a command:
$ fly launch --image hello-server:0.1.0
Creating app in /Users/toniogela/repo/personal/helloServer
Using image hello-server:0.1.0
? Choose an app name (leave blank to generate one): hello-toniogela
? Choose a region for deployment: Frankfurt, Germany (fra)
Admin URL: https://fly.io/apps/hello-toniogela
Hostname: hello-toniogela.fly.dev
Wrote config file fly.toml
? Would you like to set up a Postgresql database now? No
? Would you like to set up an Upstash Redis database now? No
? Would you like to deploy now? No
Your app is ready! Deploy with `flyctl deploy
One of the side effects of the last command execution is that fly.toml configuration file for our application gets generated. The default settings are usually fine, but we need at least to add under env our mandatory variable BASE_URL.
I removed the [[services.tcp_checks]] in favour of a [[services.http_checks]] that calls our health check API, increased some concurrency limits and forced HTTPS traffic, all by following the configuration reference.
app = "hello-toniogela"
kill_signal = "SIGINT"
kill_timeout = 120

[env]
  BASE_URL = "https://hello.toniogela.dev"

[build]
  image = "hello-server:0.1.0"

[[services]]
  internal_port = 8080
  processes = ["app"]
  protocol = "tcp"

  [services.concurrency]
    hard_limit = 500
    soft_limit = 250
    type = "requests"

  [[services.ports]]
    force_https = true
    handlers = ["http"]
    port = 80

  [[services.ports]]
    handlers = ["tls", "http"]
    port = 443

  [[services.http_checks]]
    grace_period = "10s"
    interval = "5s"
    method = "get"
    path = "/health"
    protocol = "http"
    restart_limit = 5
    timeout = "2s"
Even deploying is just a matter of running a single command:
$ fly deploy --local-only
==> Verifying app config
--> Verified app config
==> Building image
Searching for image 'hello-server:0.1.0' locally...
image found: sha256:9ffc712f96bb61eae722619ad0bd21a752e39b2a0cceca1abdb510bec18820cf
==> Pushing image to fly
The push refers to repository [registry.fly.io/hello-toniogela]
6edf61a11a72: Pushed
d5ee5e28f5b5: Pushed
688df10214b7: Pushed
5ab3fbcbc72f: Pushed
ded7a220bb05: Pushed
deployment-01GP7936X7ZMX5VXDS2MYM1C9D: digest: sha256:99b04cf901b057a10f2526e6f973285ffb09777e497cd6abd6d96c6cd73a6114 size: 1371
--> Pushing image done
==> Creating release
--> release v2 created
--> You can detach the terminal anytime without stopping the deployment
==> Monitoring deployment
Logs: https://fly.io/apps/hello-toniogela/monitoring
1 desired, 1 placed, 1 healthy, 0 unhealthy [health checks: 1 total, 1 passing]
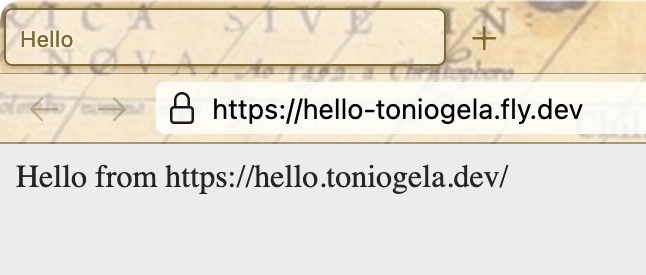
--> v0 deployed successfullyThe --local-only flag was used to perform the build only locally using the local docker daemon and pushing the previously built image. We can now check that our app is reachable under https://{appName}.fly.dev:
Secrets
Fly supports secret environment variables, and they can be easily set from the command line, triggering a redeploy:
$ fly secrets set TITLE="Mommy I'm online"
Release v1 created
==> Monitoring deployment
Logs: https://fly.io/apps/hello-toniogela/monitoring

 1 desired, 1 placed, 1 healthy, 0 unhealthy [health checks: 1 total, 1 passing]
--> v1 deployed successfully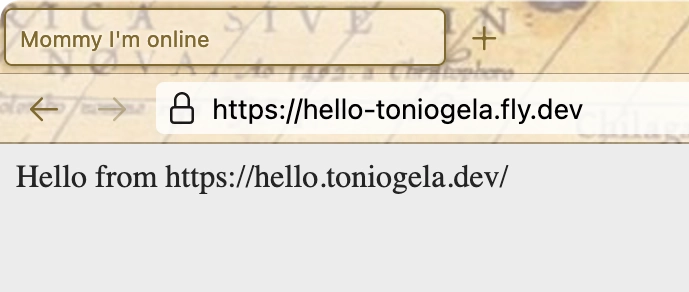
We can save these commands for later reuse in our Justfile, using dependencies between recipes and default arguments:
# Deploys on fly.io
deploy: build
    flyctl deploy --local-only

# Changes the TITLE secret on fly.io
title label="Hello":
    flyctl secrets set TITLE="{{label}}"

# Opens the web UI of fly.io
open:
    open "https://fly.io/apps/hello-toniogela/"
Adding certificates and publishing on our domain
Now that we confirmed that the server is up and running, it's time to make fly.io generate an HTTPS certificate and configure the DNS to expose the app on our domain. By default, fly.io assigns to every new app a shared ipv4 and a dedicated ipv6. This is due to a popularity increase and a global IPv4 scarcity, as announced on the Fly.io blog.
If we still desire a dedicated IPv4, i.e. for using an A record in our DNS server, we can allocate one:
$ fly ips allocate-v4
VERSION	IP           	TYPE  	REGION	CREATED AT
v4     	137.66.63.249	public	global	7s ago
To generate an HTTPS certificate, we can always use the command line:
$ fly certs add hello.toniogela.dev
You are creating a certificate for hello.toniogela.dev
We are using Let's Encrypt for this certificate.
You can configure your DNS for hello.toniogela.dev by:
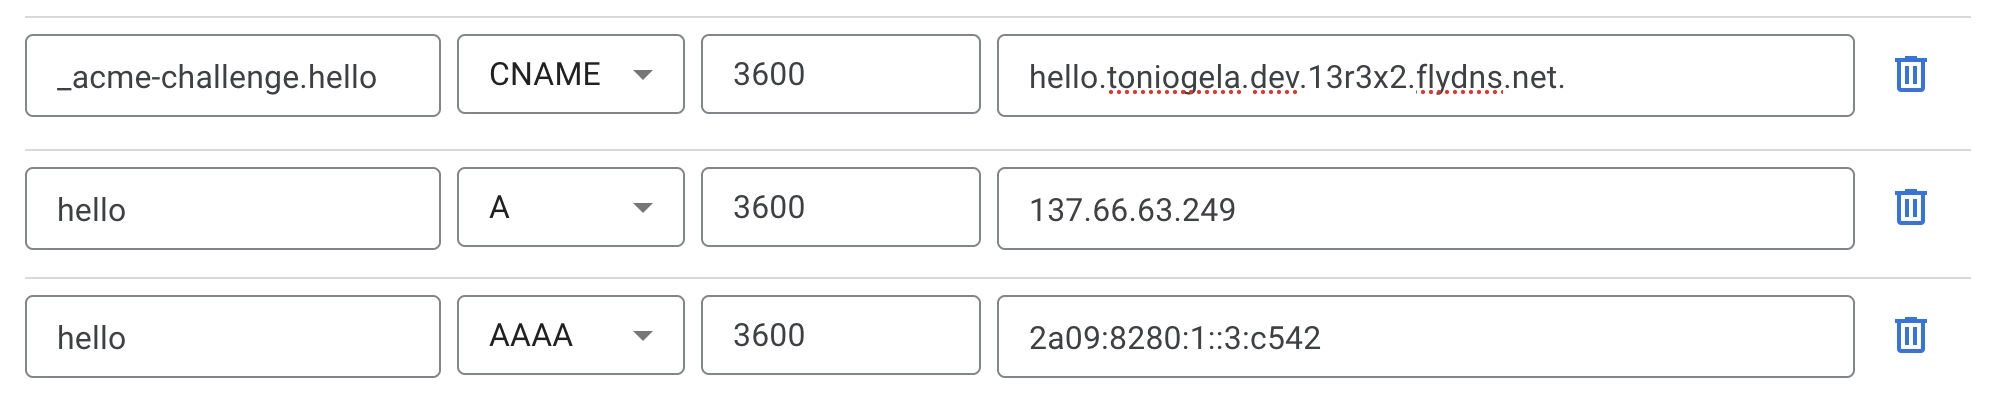
1: Adding an CNAME record to your DNS service which reads:
CNAME hello. hello-toniogela.fly.devTo speed up the certificate creation, we can visit the dedicated section on our app dashboard and follow the instructions to confirm the domain ownership:

and setup at our domain's vendor the DNS records as requested:
After a few minutes, our DNS should be propagated. We can check the status via command line:
$ fly certs check hello.toniogela.dev
The certificate for hello.toniogela.dev has been issued.
Hostname = hello.toniogela.dev
DNS Provider = googledomains
Certificate Authority = Let's Encrypt
Issued = rsa,ecdsa
Added to App = 10 minutes ago
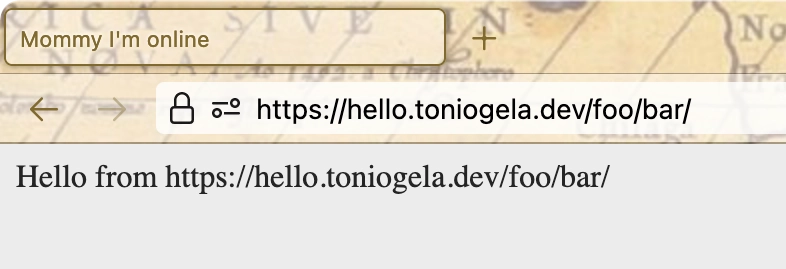
Source = flyNow we can enjoy our app directly from our domain 🎉🎉🎉
Conclusions
We saw how fast publishing a backend application on a custom domain can be following these instructions.
This article is not a comprehensive guide of either http4s, scala-cli or fly.io, but rather a series of TODO steps that might come in handy when you want to prototype an idea and show it to someone else rapidly.
Enjoy!